
MEP
SPACER
Select parallel pipe, duct and conduit runs, pick the one that stays put, and type the spacing — center-to-center, or clear space between outside faces. The other runs slide sideways into place, in the same order, and one Ctrl+Z undoes it.
Version 1.0.0 · Revit 2023–2027 · Free — sign in with a free Fulcrum account
Work email in, ZIP out — no account to download. Prefer an installer? Get the code-signed .exe. Every build’s SHA-256 is published.
Prefer to read first? Grab the how-to guide (PDF).
Even out the rack. Keep the anchor.
Select the runs, pick the one that doesn't move, and give the spacing. The other runs slide sideways, square to the runs, until each neighbor sits at spec.
- Pipe, duct and conduit — mixed in one selection, in any sizes
- The anchor run you pick never moves; everything spaces from it
- Center-to-center, or clear space between outside faces — optionally to the outside of insulation
- Runs slide horizontally, square to the run direction — the left-to-right order never changes
- One transaction: one Ctrl+Z puts every run back
Select, anchor, space.
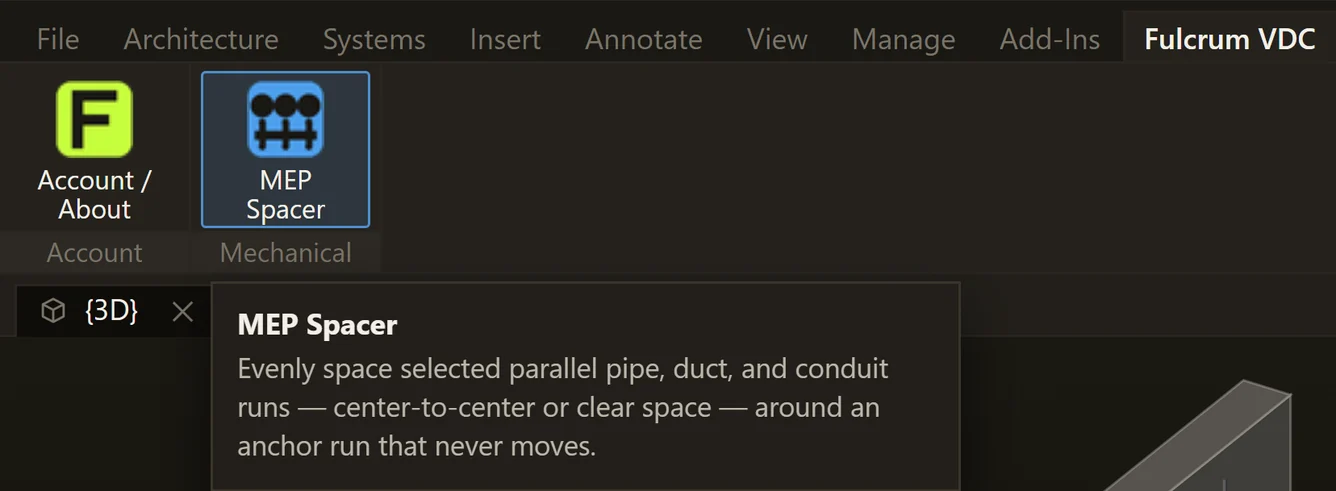
One button on the Fulcrum VDC tab, in the Mechanical panel. It walks the same order every time.
Select the runs
Select them before you click — a crossing selection works. Make sure it touches every segment of each run; whatever isn't a straight pipe, duct or conduit segment or a fitting is simply left out. With nothing selected, MEP Spacer asks how: Window-select runs takes only elements completely inside the box, so box the runs end to end; Pick one element at a time takes each segment you click until you press Esc (fittings can't be picked this way, so couplings are left to Revit).
Pick the anchor
“Pick the ANCHOR run — it will not move.” Only the runs you selected can be picked. The anchor can sit at either end of the rack or in the middle; the others space away from it on both sides.
Set the spacing
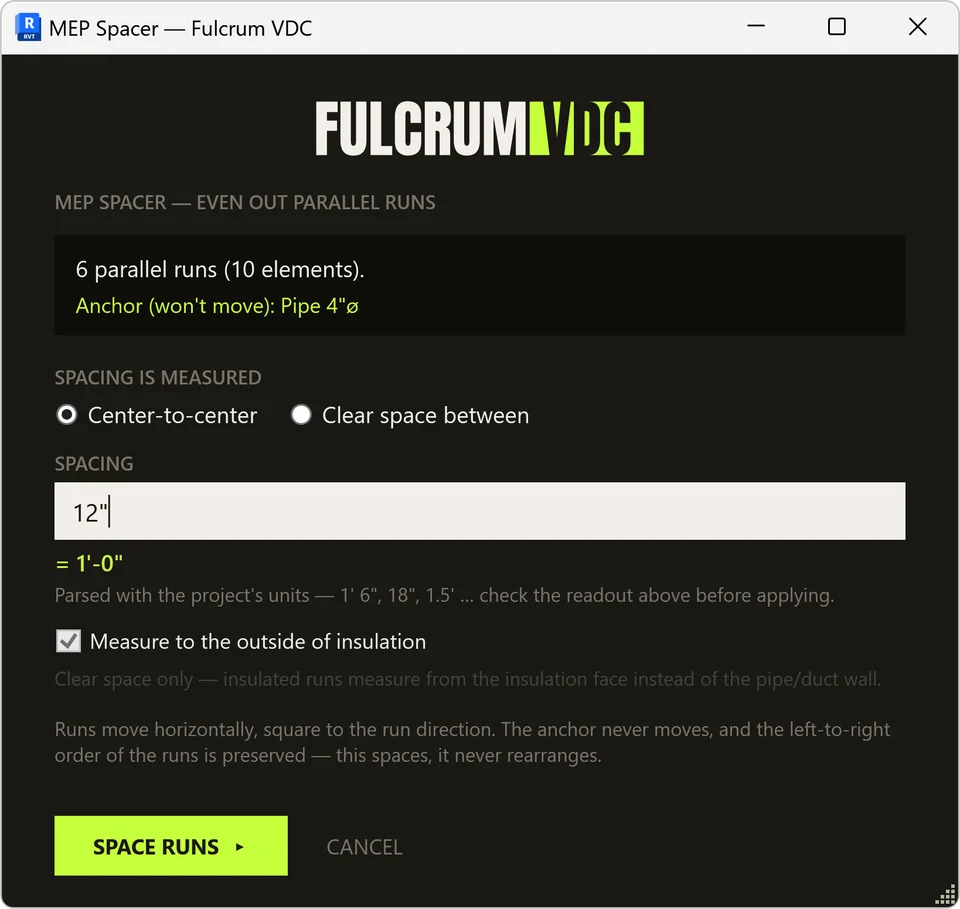
Choose how it's measured — Center-to-center or Clear space between — and type the spacing in the project's units: 1' 6", 18", 1.5'. A live readout shows how Revit read it before anything moves. For clear space, tick Measure to the outside of insulation to measure from the insulation face.
Space runs
Every run that needs to move does, in one transaction. A summary says how many runs were spaced, confirms the anchor held, and lists what didn't move and why — already at spec, pinned, or not parallel.
The dialog, top to bottom
- What it found. “6 parallel runs (10 elements).” — or, for risers, “4 vertical risers (4 elements) — spaced along the rack line.” — then the anchor, in lime: “Anchor (won't move): Pipe 4"ø”.
- What can't take part. Elements that aren't parallel to the anchor, have the wrong orientation or can't be read are counted here and detailed in the summary.
- More than one tier. If the selection spans more than one elevation tier (runs more than 1'-0" apart in height), a warning says they'll be spaced as one row, interleaved by plan position — cancel and select one tier at a time to keep each tier's own spacing.
- Spacing is measured center-to-center or as clear space between. The first time, it's Center-to-center.
- Spacing. Starts empty the first time — there's no default spacing. The readout under it (
= 1'-0") is always in feet and inches, to the nearest 1/16". - Measure to the outside of insulation. Ticked by default, and only available for clear space.
- SPACE RUNS ▸ applies (Enter); CANCEL (Esc) closes it with nothing changed.
What you'll see.


Racks, risers, and runs that aren't square.
- Pipe, duct and conduit. Straight segments, in any mix and any sizes. Sizes are read from the model — outside diameter for pipe and conduit, width or diameter for duct — so there's nothing to look up.
- Horizontal racks at any angle. The runs don't have to be square to the project — spacing is measured square to the anchor's direction in plan. Runs more than 1° out of parallel with the anchor are skipped and reported.
- Sloped runs. Parallel is judged in plan, and the move is purely horizontal, so a sloped run keeps its slope.
- Vertical riser banks. Select one row of risers and they're spaced along the row's own line. A bank that isn't a single line in plan — an L or a grid — is refused, with a note to select one row at a time.
- Runs in pieces. Segments that line up end to end move together as one run, and so do runs stacked at the same plan position at different heights — they're never spread apart. Joined segments that are slightly out of line stay one run.
- Couplings and fittings you select ride along with their run. A fitting that joins two different runs, or a pinned one, isn't moved by the tool — Revit's own connection behavior decides what happens to it.
- Not supported: cable tray, flex pipe and flex duct, MEP fabrication parts, curved segments, and elements inside linked models.
It spaces. It never rearranges.
- Mixed sizes land right. In clear-space mode each neighbor's own half-width is added, so a 4" pipe next to a 1¼" conduit gets the same clear gap as two 4" pipes. Clear space is a gap in plan, measured horizontally.
- Pinned runs stay put. A pinned run is never moved; the runs beyond it space off where it actually is, so nothing is driven through it, and the summary lists it as skipped.
- No overlaps. A center-to-center spacing that would make two neighbors' outside walls overlap is refused, and the message gives the minimum spacing. If insulation would end up squeezed while the walls stay clear, the summary warns you.
- Already at spec is left alone. A run within 1/64" of its target doesn't move — so running it again with the same spacing changes nothing.
- A run moves whole or not at all. If Revit refuses to move a run, it stays where it was, in one piece, and the summary says so. If Revit can't reconcile the connected geometry and you cancel its error, the whole operation rolls back and it tells you. Revit warnings raised by the move are dismissed; genuine errors still show.
- Check the readout. In a feet-and-inches project Revit reads a bare number as feet — 12 is 12'-0". The readout shows exactly what was read before anything moves.
- Remembers your last settings — mode, spacing and the insulation choice — for the rest of the Revit session. Nothing is saved to disk.
- Creates nothing. No views, families, parameters or dimensions: it only moves the runs you chose. Nothing about your model leaves your PC. Fulcrum Hub sees only your sign-in (with a device ID — a one-way hash of Windows' machine ID — this PC's name and its Windows version), a license check and a count of runs moved — the full list is on the Security page.
Per-user install. No admin rights.
- Autodesk Revit 2023, 2024, 2025, 2026 or 2027 on Windows.
- A free Fulcrum account. Sign in inside Revit: Fulcrum VDC tab → Account / About → Sign In (it keeps you signed in for up to 30 days). No trial, no card. Create the account at hub.fulcrumvdc.com.
- An internet connection when you use it. Each run checks your free license with Fulcrum Hub; offline, it won't run.
- Close Revit first. If the installer says Revit is open, close Revit fully and re-run it.
- First start: Always Load. Revit may ask once whether to load an add-in signed by FULCRUM VDC, LLC — click Always Load, and it won't ask again for Fulcrum tools. (Do Not Load skips it, and the Fulcrum VDC tab won't appear.)
- Installs only this tool. MEP Spacer plus the Account / About button — no other Fulcrum apps.
- ZIP or .exe. The installer ZIP is the primary download; a code-signed .exe is also available.
- Uninstall. Run the installer again → Uninstall, or run
UNINSTALL.cmdfrom the ZIP.
Button missing after install? It's on the Fulcrum VDC tab, in the
Mechanical panel. If you clicked Do Not Load when Revit asked about
the add-in, restart Revit and choose Always Load. With the .exe, make sure your Revit version was
ticked. With the ZIP, close Revit, run INSTALL.cmd again
and check that the “Installed for:” line lists your version. Then
restart Revit. Still stuck?
Send us a message.
Questions, answered.
What can it space?
Straight pipe, duct and conduit segments — mixed in one selection, in any sizes. Horizontal racks at any angle in plan, and vertical riser banks, one row at a time, spaced along the row's own line. Sloped runs take part and keep their slope. Cable tray, flex pipe and flex duct, MEP fabrication parts, curved segments and elements in linked models aren't supported.
Center-to-center or clear space — what's the difference?
Center-to-center sets the distance between neighboring centerlines. Clear space sets the gap between neighbors' outside faces: each run's own half-width is added, so mixed sizes land right. With “Measure to the outside of insulation” ticked (the default), clear space is measured from the insulation face instead of the pipe or duct wall. Either way it's measured in plan.
Which runs move, and which way?
Every run except the anchor — and except pinned runs, which never move; the runs beyond a pinned run space off its actual position. Runs slide horizontally, square to the run direction, never up or down or along their own length, and the left-to-right order is always kept: it spaces, it never rearranges. Segments that line up end to end, and runs stacked at the same plan position, move together.
What happens to couplings, fittings and connections?
A coupling or fitting you selected moves with its run when everything it joins in your selection belongs to that run; a fitting that joins two different runs, or a pinned one, isn't moved by the tool. Anything the tool doesn't move — including fittings you didn't select — is left to Revit's own connection behavior. If Revit can't reconcile the connected geometry and you cancel its error, the whole operation is rolled back and nothing changes.
I typed 12 and meant inches.
In a feet-and-inches project Revit reads a bare 12 as 12 feet. The live readout under the spacing box shows how your text was read — = 12'-0" — before anything moves, so type 12" or 1' instead. The readout is always in feet and inches, to the nearest 1/16".
Can I undo it?
Yes. The whole operation is one transaction, “Space MEP runs”, so one Ctrl+Z puts every run back. A run is moved whole or not at all — if Revit won't move one, it stays where it was, in one piece, and the summary says so.
Which Revit versions are supported?
Revit 2023, 2024, 2025, 2026 and 2027, on Windows.
Is it free? Do I need an account?
It's free. You need a free Fulcrum account and sign in inside Revit: Fulcrum VDC tab → Account / About → Sign In (it keeps you signed in for up to 30 days). No trial, no card. It needs an internet connection when you use it — each run checks your free license with Fulcrum Hub.
SmartScreen warned me about the download.
The .exe is code-signed as Fulcrum VDC, LLC, so Windows names us as the publisher instead of showing “Unknown Publisher.” SmartScreen can still flag a brand-new build until enough people have downloaded it — choose More info → Run anyway. Confirm the signature under Properties → Digital Signatures.
1.0.0 — first public release.
Every tool's full revision history lives in the changelog.
- MEP Spacer button on the Fulcrum VDC tab, in the Mechanical panel.
- Evenly spaces parallel pipe, duct and conduit runs around an anchor run that never moves — horizontal racks at any angle, and vertical riser banks.
- Center-to-center or clear space, optionally to the outside of insulation; mixed sizes handled.
- Spacing typed in the project's units, with a live readout of how it was read.
- Order always kept; selected couplings ride along; pinned runs stay put; overlapping spacings refused.
- One transaction — one Ctrl+Z undoes it — and a summary of what moved and what was skipped.
- Revit 2023–2027. Free with a Fulcrum account; needs an internet connection when you use it.
Even out the rack.
Pick the anchor, type the spacing — the other runs slide into place, in order.
Download freeAutodesk and Revit are trademarks of Autodesk, Inc. Fulcrum VDC, LLC is not affiliated with or endorsed by Autodesk.