
CONDUIT
RUN TAGGER
Click Conduit Run Tags and pick one piece of a run. The tool follows every conduit and fitting joined to it, shows the run's developed length and total bends, and writes them — with the panel, circuits, homerun and circuit type you type — into shared parameters on every element of the run. Your own tags, schedules, filters and Navisworks read them.
Version 1.0.0 · Revit 2023–2027 · Free — sign in with a free Fulcrum account
Work email in, ZIP out — no account to download. Prefer an installer? Get the code-signed .exe. Every build’s SHA-256 is published.
Prefer to read first? Grab the how-to guide (PDF).
One pick. The whole run labeled.
Pick any conduit or conduit fitting. Every piece physically joined to it is traced — no circuits, no panel connection — and the run's data is written onto each one.
- Pick one conduit or conduit fitting — the run is traced through its joined connectors, with no electrical circuit or panel connection needed
- The panel, circuit number(s), homerun and circuit type you type, plus the run's developed length and total degrees of bend, land on every conduit and fitting of the run
- They're shared parameters: your own tag families, schedules, view filters and Navisworks read them
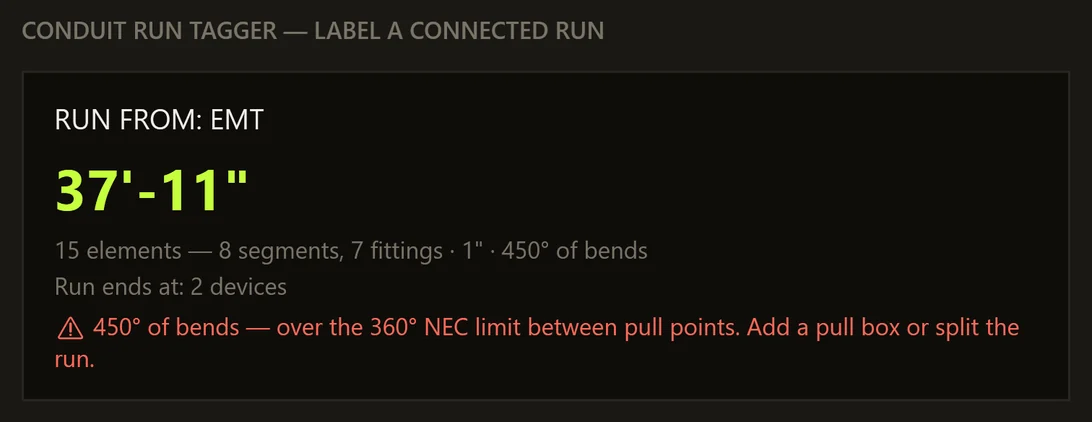
- More than 360° of bends is flagged in red before you apply
- Update Run Tags refreshes a labeled run after you extend or reroute it, and EXPORT CSV… lists every labeled run in the model
Pick, check, apply.
Two buttons on the Fulcrum VDC tab, in the Electrical panel. One labels a run; the other refreshes it after the conduit changes.


Click Conduit Run Tags and pick one piece
The status bar asks: “Pick any conduit or conduit fitting on the run to label (Esc to finish)”. Only conduit and conduit fittings can be picked. From that one element the tool follows every joined connector — conduit to fitting to conduit — until the run ends.
Read the run
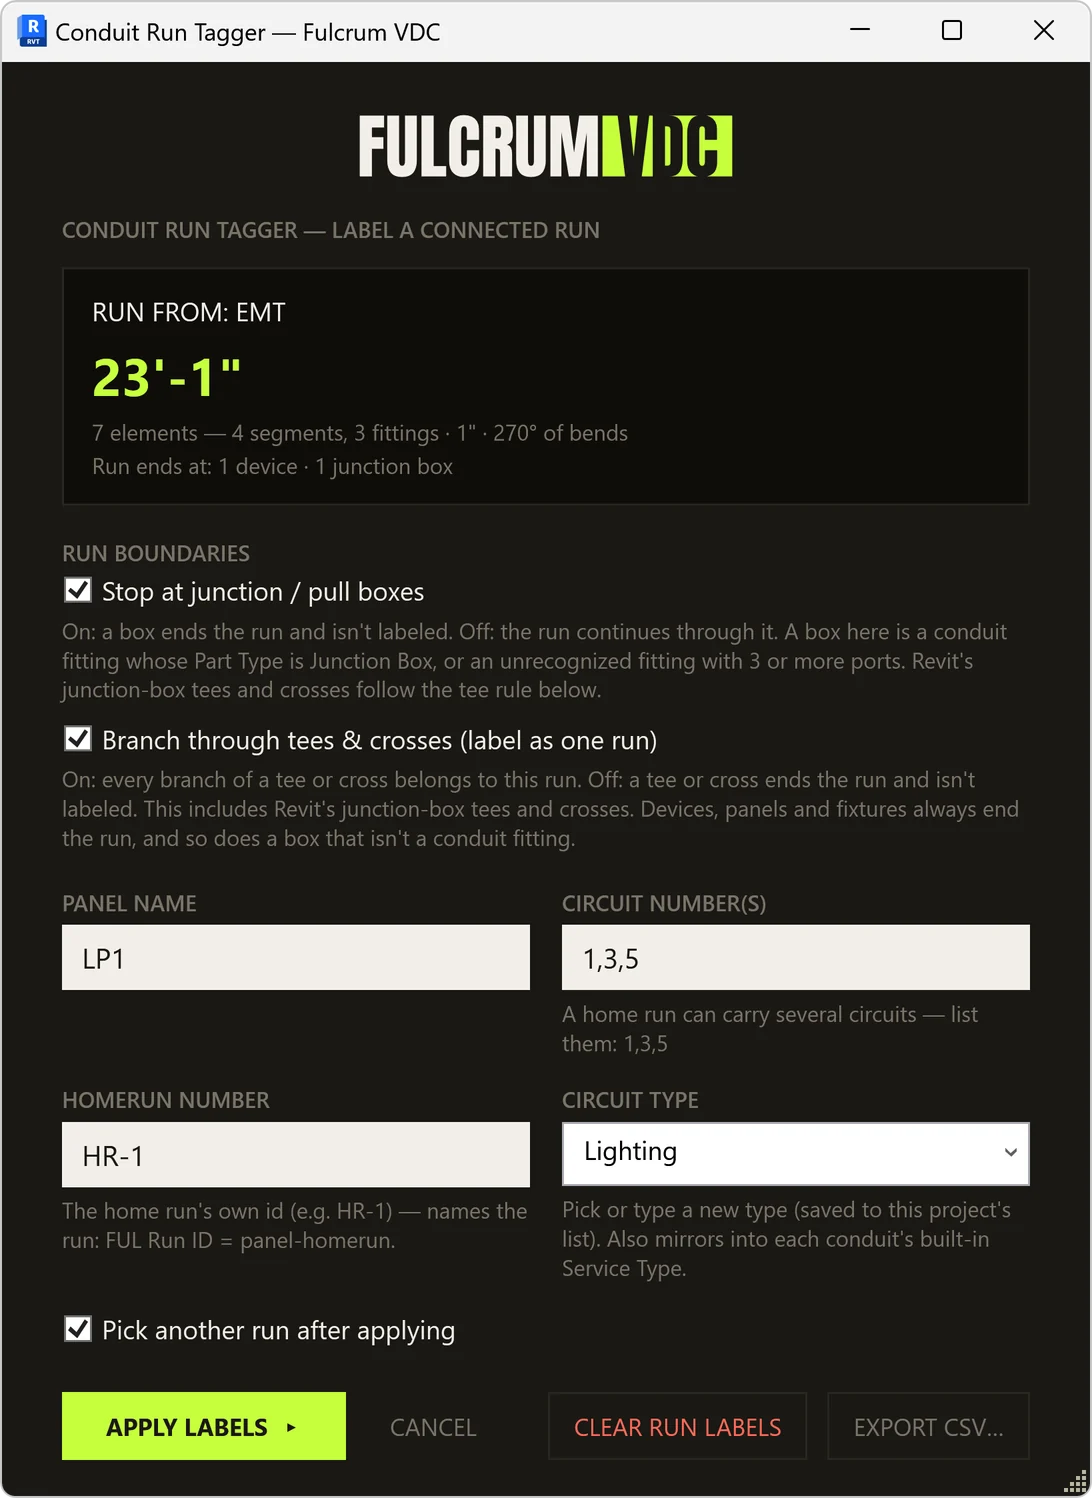
The Conduit Run Tagger window opens on what it found: the developed length in large type, a line like “7 elements — 4 segments, 3 fittings · 1" · 270° of bends”, and where the run ends — “Run ends at: 1 device · 1 junction box”. Past 360° of bends, a red line says so before you apply anything.
Set where the run stops
Two boxes under RUN BOUNDARIES, both ticked to start. Stop at junction / pull boxes: on, a box ends the run and isn't labeled; off, the run continues through boxes. Branch through tees & crosses (label as one run): on, a tee's branches all belong to this run; off, a tee ends it. Change either and the run is re-traced at once. Which of the two rules a fitting follows comes from its family's Part Type — see The details.
Type the label
Four boxes: PANEL NAME, CIRCUIT NUMBER(S), HOMERUN NUMBER and CIRCUIT TYPE. A home run can carry several circuits, so list them — 1,3,5. Pick the circuit type from the project's list, or type a new one. Fill in at least one of the four.
Apply labels
APPLY LABELS ▸ writes the same seven values onto every conduit and fitting of the run, in one undo step. With Pick another run after applying ticked — it is to start — the pick prompt comes straight back, and the next window opens with the last run's values, ready to edit. Esc finishes.
Later: Update Run Tags
The values are text, so they don't follow the model. After you extend or reroute a labeled run, click Update Run Tags and select it: the new pieces take the run's label, and the length and bends are recomputed from what's connected now.
What you'll see.

The run's data, on every piece of it.
Seven shared parameters on Conduits and Conduit Fittings, in the Data group of Properties. Every conduit and fitting of a run carries the same seven values.
| Parameter | What it holds | Demo run |
|---|---|---|
| FUL Panel | The panel name you typed | LP1 |
| FUL Circuit | The circuit number or numbers you typed | 1,3,5 |
| FUL Homerun | The homerun number you typed | HR-1 |
| FUL Circuit Type | The circuit type you picked or typed | Lighting |
| FUL Run Length | The run's developed length, in feet and inches to the nearest inch | 23'-1" |
| FUL Run Bends | The total degrees of bend in the run | 270° |
| FUL Run ID | Panel and homerun joined, to name the run; with no homerun, the circuit list stands in | LP1-HR-1 |
Your own tag families
A conduit tag family of yours can show any of the seven. The tool places no tags and ships no tag family.
Conduit and fitting schedules
Schedule, sort and group by panel, circuit, homerun or circuit type, with each run's length and bends beside them.
Filter and color by run data
View filters can use them. Conduit Colors, a separate free download, builds the color filters — its page demo colors a rack by FUL Circuit Type, which this tool writes.
Run data on the elements
The values sit on each conduit and fitting, so Navisworks reads them as properties of each one.
- Text, on purpose. All seven are text parameters, so a tag or a schedule shows exactly the string you see in Properties, whatever the project's units. The other side of that: they don't change when the conduit does — run Update Run Tags after edits.
- Service Type too. The circuit type is also copied into each conduit's built-in Service Type, unless you leave the circuit type blank.
- Added once per project. The first time either button runs in a project, it adds the seven parameters in their own undo step, “Add conduit run parameters”. It briefly points Revit at a temporary shared-parameter file to do that, then puts your own shared-parameter file setting back. If the parameters can't be added, it stops before any pick and says so — in a workshared model, sync with central and try again.
Keep the labels true.
The values are text: they don't move with the model. Three things you'll do after the first label.
Update Run Tags
After you extend, reroute or splice a labeled run, Update Run Tags spreads the run's label to every piece now attached and recomputes the length and bends. There are three ways in:
- Select first, then click. Conduit and conduit fittings you've already selected are processed straight away.
- Window-select runs. With nothing selected, it asks how you want to select. Drag rectangles over conduit — as many as you need, then Esc. Every labeled run a window touches is refreshed from its own label.
- Pick one element at a time. The element you pick decides: its panel, circuit(s), homerun and circuit type overwrite its whole attached run. Use it to settle a conflict, or to re-label runs you've joined.
Selecting or windowing never guesses. A run with one label is re-stamped, new pieces included. A run with no label is skipped and counted. A run that carries two different labels — two runs spliced together — is left untouched and reported as a conflict. A summary at the end lists each run it updated, with its element count, length and bends, and marks any run over 360°. Each run is its own undo step, and the trace uses the two RUN BOUNDARIES boxes as you last left them.
Clear run labels
CLEAR RUN LABELS, in the Conduit Run Tagger window, blanks all seven values on every element of the traced run. There's no confirmation, and it's one undo step — Ctrl+Z brings the labels back. Service Type is blanked only where it still matches the circuit type the tool copied in; a value you set by hand stays. The parameters themselves stay in the project.
Export CSV
EXPORT CSV…, in the same window, writes every labeled run in the model — not just the one in the window — from the values already on the elements. The columns are Run ID, Panel, Circuit, Homerun, Circuit Type, Run Length, Bends, Elements, Segments, Fittings and Sizes: one row per FUL Run ID, sorted by it. The file is saved as UTF-8 with a byte-order mark, which is what Excel needs to show the degree sign.
Two separate runs that carry the same Run ID come out as one row: the element counts add up, but Run Length and Bends are taken from only one of them. Give each run its own panel and homerun.
How a run is traced and measured.
- Physical connections only. A run is what's joined connector to connector. No electrical circuit, wiring or panel schedule is needed or read. A gap or an unconnected end splits a run, and conduit in a linked model can't be picked.
- What ends a run. A device, panel, fixture or piece of equipment — anything that isn't conduit or a conduit fitting — always ends it, and so does an open conduit end. A junction or pull box ends it while “Stop at junction / pull boxes” is ticked; a tee or cross ends it when “Branch through tees & crosses” is unticked. The box or tee that ends a run isn't labeled.
- Tee or box? The Part Type decides. The tool reads each fitting family's Part Type. Tee or Cross — Revit's junction-box tee and cross part types included: the tee rule. Junction Box: the box rule. Elbow or Union (a coupling): passed through. Anything else counts as a junction box if it has three or more ports, and is passed through if it has two. “Run ends at” names what stopped the run. The box rule covers boxes that are conduit fittings: a box from another category, such as an electrical fixture, is a device and always ends the run.
- What's passed through. Elbows, couplings and other two-port fittings. The element you pick is always included and traced through, even if it's a box.
- Length. The developed centerline: each straight conduit at its length, each elbow or other two-port fitting as the arc swept through it, and a fitting with three or more ports inside the run — a tee, cross or box — as its center-to-port legs, an approximation. It's shown and stored in feet and inches, to the nearest inch.
- Bends. The sum of the bend through every two-port fitting in the traced run: an elbow reads its angle — 90°, 45°, 22.5° — and a coupling 0°. A fitting with three or more ports — a tee, cross or box — adds nothing. Bends are read from fittings only: if a run with corners reads 0°, check that each corner is an elbow fitting, joined on both sides.
- The 360° line. More than 360° of bends puts a red line in the window — “⚠ 450° of bends — over the 360° NEC limit between pull points. Add a pull box or split the run.” — and Update Run Tags marks the run in its summary. It warns; it doesn't stop you applying. Exactly 360° isn't flagged.
- One total for the whole traced run. With tees branched through, every branch's bends add into one number; with the box rule off, the total counts across pull boxes too. The NEC counts bends per pull, between pull points, so the total can be higher than any one pull. Treat it as a flag to look closer, not a code review.
- Circuit types. The list starts with Power, Lighting, Security, Fire Alarm, Data/Comm, Controls, Emergency and Spare. A type you type is added to the list and saved in the project, for everyone on the model.
- One undo step per run. Each APPLY is a single step named for the run — “Label conduit run LP1-HR-1” — and if Revit rolls a change back, the tool tells you the run wasn't labeled.
- Remembers your last run. Until Revit closes, the label boxes open with the last values you applied, and the two boundary boxes stay as you left them — across models, and for both buttons. CANCEL doesn't undo a change to the boundary boxes.
- Very large runs. A trace stops at 20,000 elements, and the window says the totals are truncated.
- It writes parameters. That's all. No annotation tags, no tag family, nothing drawn in any view, and it never moves, resizes or creates conduit. Nothing about your model leaves your PC. Fulcrum Hub sees only your sign-in (with a device ID — a one-way hash of Windows' machine ID — this PC's name and its Windows version), a license check and a count of runs labeled, cleared or updated — the full list is on the Security page.
Per-user install. No admin rights.
- Autodesk Revit 2023, 2024, 2025, 2026 or 2027 on Windows.
- A free Fulcrum account. Sign in inside Revit: Fulcrum VDC tab → Account / About → Sign In (it keeps you signed in for up to 30 days) — or just click Conduit Run Tags, which opens the sign-in window if you aren't signed in. No trial, no card. Create the account at hub.fulcrumvdc.com.
- An internet connection when you use it. Each click of either button checks your free license with Fulcrum Hub; offline, it won't run.
- Close Revit first. If the installer says Revit is open, close Revit fully and re-run it.
- First start: Always Load. Revit may ask once whether to load an add-in signed by FULCRUM VDC, LLC — click Always Load, and it won't ask again for Fulcrum tools. (Do Not Load skips it, and the Fulcrum VDC tab won't appear.)
- Installs only this tool. The Conduit Run Tags and Update Run Tags buttons plus the Account / About button — no other Fulcrum apps. Conduit Colors is its own free download.
- ZIP or .exe. The installer ZIP is the primary download; a code-signed .exe is also available. The .exe lets you tick which Revit versions to install for; the ZIP's
INSTALL.cmdinstalls for every version from 2023 to 2027. - Uninstall. Run the installer again → Uninstall, or run
UNINSTALL.cmdfrom the ZIP. The parameters and values already in your projects stay there — use CLEAR RUN LABELS first if you want a run's values gone.
Buttons missing after install? They're on the Fulcrum VDC tab, in the
Electrical panel. If you clicked Do Not Load when Revit asked about
the add-in, restart Revit and choose Always Load. With the .exe, make
sure your Revit version was ticked. With the ZIP, close Revit, run
INSTALL.cmd again and check that the “Installed for:”
line lists your version. Then restart Revit. Both buttons write a
diagnostic log to %APPDATA%\Fulcrum\conduit-run-tagger.log.
Still stuck? Send us a message.
Questions, answered.
Does it place tags in my views?
No. Conduit Run Tagger places no annotation tags, ships no tag family and draws nothing in any view. It writes the run's data — panel, circuit number(s), homerun, circuit type, run length and total bends — into shared parameters on every conduit and conduit fitting of the run. Your own tag families, schedules, view filters and Navisworks read those parameters.
Do the conduits need circuits or a panel connection?
No. A run is traced through physically joined connectors only — conduit to fitting to conduit. No electrical circuit, wiring or panel connection is needed or read; the panel name and circuit numbers are the ones you type. A gap or an unconnected end splits a run, and conduit in a linked model can't be picked.
What ends a run?
A device, panel, fixture or piece of equipment — anything that isn't conduit or a conduit fitting — always ends it, and so does an open conduit end. A junction or pull box ends it while “Stop at junction / pull boxes” is ticked, and the box isn't labeled. A tee or cross ends it when “Branch through tees & crosses” is unticked. Which rule a fitting follows comes from its family's Part Type: Tee and Cross are tees and crosses — Revit's junction-box tee and cross part types included — and any other fitting with three or more ports counts as a junction box. Elbows, couplings and other two-port fittings are passed through. Both boxes are ticked to start, and changing either re-traces the run at once.
How are the length and the bends worked out?
The length is the developed centerline: each straight conduit at its length, each elbow or other two-port fitting as the arc through it, and a fitting with three or more ports inside the run — a tee, cross or box — as its center-to-port legs, to the nearest inch. The bend total adds the bend through every two-port fitting in the traced run: an elbow reads its angle, a coupling 0°. More than 360° puts a red warning in the window — the NEC limit between pull points — but doesn't stop you applying, and exactly 360° isn't flagged. The total covers the whole traced run: with tees branched through, every branch's bends add into one number, and with the box rule off it counts across pull boxes too.
I extended a labeled run. Do the values update?
Not by themselves — the seven values are text and don't follow later edits. Click Update Run Tags and select the run: the new pieces take the run's label, and the length and bends are recomputed from what's connected now. If two runs with different labels have been joined, nothing is changed and the conflict is reported; run it again, choose “Pick one element at a time”, and the element you pick decides.
What's in the CSV?
Every labeled run in the model, from the values already on the elements: Run ID, Panel, Circuit, Homerun, Circuit Type, Run Length, Bends, Elements, Segments, Fittings and Sizes — one row per FUL Run ID. Two separate runs that carry the same Run ID export as one row: the element counts add up, but the length and bends come from only one of them. Give each run its own panel and homerun.
Can I remove the labels?
Yes. CLEAR RUN LABELS blanks all seven values on every element of the traced run, without a confirmation, in one undo step — Ctrl+Z brings them back. Service Type is cleared only where it still matches the circuit type the tool copied in; a value you set by hand stays. The parameters themselves stay in the project.
Does it work with Conduit Colors?
Yes — they are separate free downloads that work together. The seven values are ordinary shared parameters on conduit and conduit fittings, so view filters can use them. Conduit Colors colors conduit by any filterable parameter, and its page demo colors a rack by FUL Circuit Type — a value this tool writes.
Which Revit versions are supported?
Revit 2023, 2024, 2025, 2026 and 2027, on Windows.
Is it free? Do I need an account?
It's free. You need a free Fulcrum account and sign in inside Revit: Fulcrum VDC tab → Account / About → Sign In (it keeps you signed in for up to 30 days). No trial, no card. It needs an internet connection when you use it — each click of either button checks your free license with Fulcrum Hub.
SmartScreen warned me about the download.
The .exe is code-signed as Fulcrum VDC, LLC, so Windows names us as the publisher instead of showing “Unknown Publisher.” SmartScreen can still flag a brand-new build until enough people have downloaded it — choose More info → Run anyway. Confirm the signature under Properties → Digital Signatures.
1.0.0 — first public release.
Every tool's full revision history lives in the changelog.
- Conduit Run Tags and Update Run Tags buttons on the Fulcrum VDC tab, in the Electrical panel.
- Pick one conduit or conduit fitting: the run is traced through its physically joined connectors, with no electrical circuit or panel connection needed.
- Run boundaries you set per run: stop at junction / pull boxes, branch through tees and crosses.
- Panel, circuit number(s), homerun and circuit type, plus the run's developed length and total bends, written to seven shared parameters on every conduit and fitting of the run; the circuit type is also copied into each conduit's Service Type.
- A red warning when a run has more than 360° of bends.
- A circuit-type list saved in the project, which you can add to.
- Update Run Tags refreshes labeled runs after edits — by selection, window or single pick — and reports conflicting labels instead of guessing.
- CLEAR RUN LABELS for one run, and EXPORT CSV… for every labeled run in the model.
- Revit 2023–2027. Free with a Fulcrum account; needs an internet connection when you use it.
Label the run.
One pick: panel, circuits, length and bends on every piece of the run — ready for your tags, schedules and filters.
Download freeAutodesk, Revit, and Navisworks are trademarks of Autodesk, Inc. NEC and National Electrical Code are registered trademarks of the National Fire Protection Association. Fulcrum VDC, LLC is not affiliated with or endorsed by either.